


These amazing Korean BBQ Tacos have become a staple in our house. They're completely make-ahead friendly, have an awesome depth of flavor with only a handful of ingredients, and you can prepare everything the day before or even a few days before and then just heat and serve. That makes it a total dinner time win. So now go and spice up your taco night this week!

Keep it simple with the crockpot
Putting a lot of flavor into your pork butt while it cooks is essential to getting it started in the right direction. In order to get the Korean BBQ flavor to really come through, start with the few simple ingredients put in the crock pot with the pork.
Another way to intensify the flavors in pork is to broil the pork after it's been shredded. Place it on a dark baking sheet under a broiler on high for about 5-10 minutes, stirring once.
Adding this simple step will give you those delicious "burnt" ends and slightly crunchy bits along with the soft parts of the pork. It really adds so much texture and flavor to these Korean BBQ Tacos.
Can I make this in an Instant Pot?
Sure thing! I haven't tried it yet, but cooking a pork shoulder for pulled pork in the InstaPot is fairly simple. There is just one added step of cutting the pork into large chunks before placing in the Instant Pot.
Cook with the same amount of liquid on high pressure for 60 minutes and then pressure release naturally for 20 minutes. (We haven't tried it this way yet, but it should work. We'll update when we know for sure the best way to cook this in the InstaPot.)
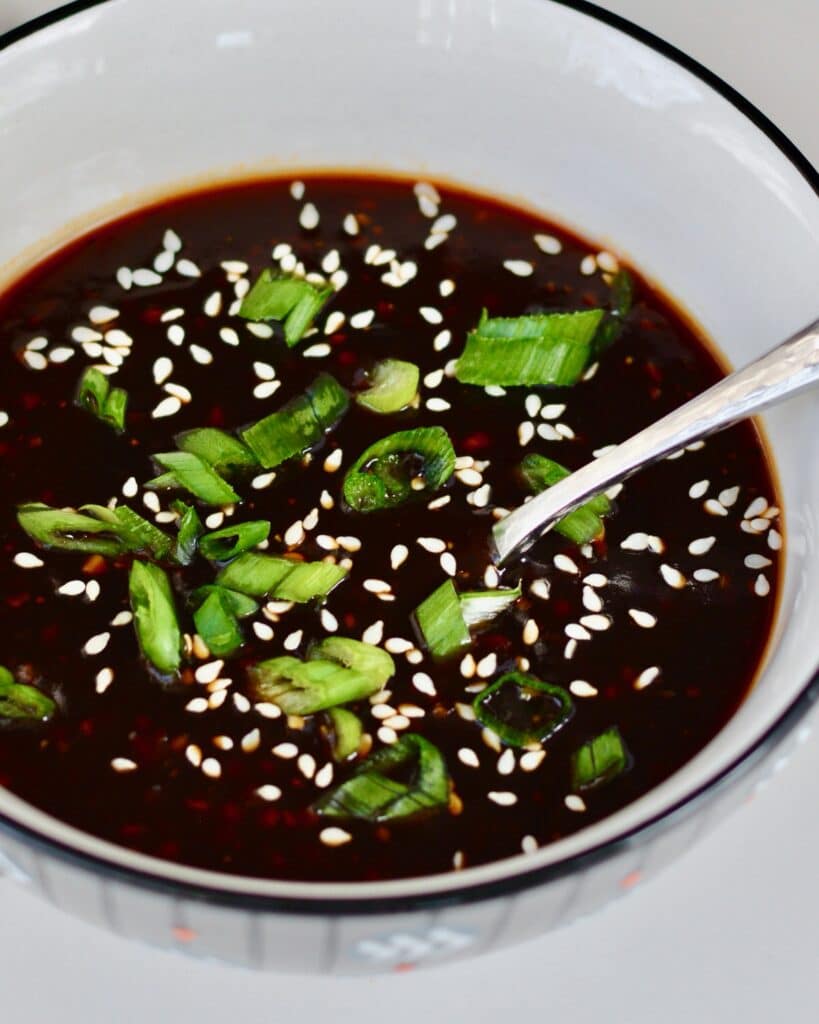
Making Korean BBQ Taco Sauce
Let's talk BBQ sauce. I love sauce. Like, love love. So when I set out to make Korean tacos, I knew it was going to need a dynamite sauce to go along. This BBQ sauce recipe once again combines my favorite Korean flavors all in a sweet, smooth sauce.
I make this ahead of time and keep it on hand to dip everything into. So now I'm working on a Korean style chicken tender and this will definitely be my dipping sauce. But on these Korean BBQ Tacos, it really takes it to the next level!
Can I Make These Tacos Gluten Free?
Absolutely! Since I became gluten intolerant I was still able to make this recipe using Tamari sauce instead of soy sauce. Gluten free soy sauce is my favorite, but I've only been able to find that at our specialty Asian store. Also, La Choy brand soy sauce is naturally gluten free!
Tamari and Coconut Aminos are widely available and are great substitutions too. Be aware that some of these are NOT low in sodium, so you'll want to water it down by half or omit any additional salt. Every brand is a bit different, so be sure to taste and adjust as needed.
Making Quick Kimchi
I absolutely love this quick kimchi. I originally created this recipe to go with my Korean BBQ Sliders recipe. And I didn't change it at all for these tacos. It tastes great 5 minutes after you make it, and is still delicious 2 days later. Just throw it in the fridge and let the rice vinegar soften it and make it more and more "kimchi-like" as it softens and intensifies in flavor.
If you want to take these to the next level, make these homemade tortillas to go with these tacos. Outstanding!

Can I make these tacos for a crowd?
Absolutely! That's what I love about using pork shoulder, it makes a TON of meat. I usually cook a 3-4 pound piece and then shred and freeze half for another meal.
A 4 pound piece of pork shoulder yields about 8 cups of shredded meat. This will allow you to make about 32 tacos (at ¼ cup of meat per taco) and feed about 10-15 people.
This can easily be multiplied by making your pork shoulder ahead of time and cooking as many as you need. Then simply reheating before serving. This would make a GREAT dinner for a big party, served with some simple appetizers, and easy desserts and refreshing drinks.

How to store leftover pork shoulder
Once the pork butt/shoulder has been cooked, shredded and cooled, store leftovers in an air tight container (these linked are my favorite storage dishes). This will keep in the refrigerator for up 5 days.
To freeze pork, place leftovers in a ziploc bag and then in a bag again to prevent freezer burn. This will keep fresh in the freezer for up to 3 months. Be sure to date your bag before storing.
Allow pork to thaw in the refrigerator overnight before reheating with your preferred method. It reheats wonderfully in the microwave, oven or stovetop.
More Taco Topping Ideas
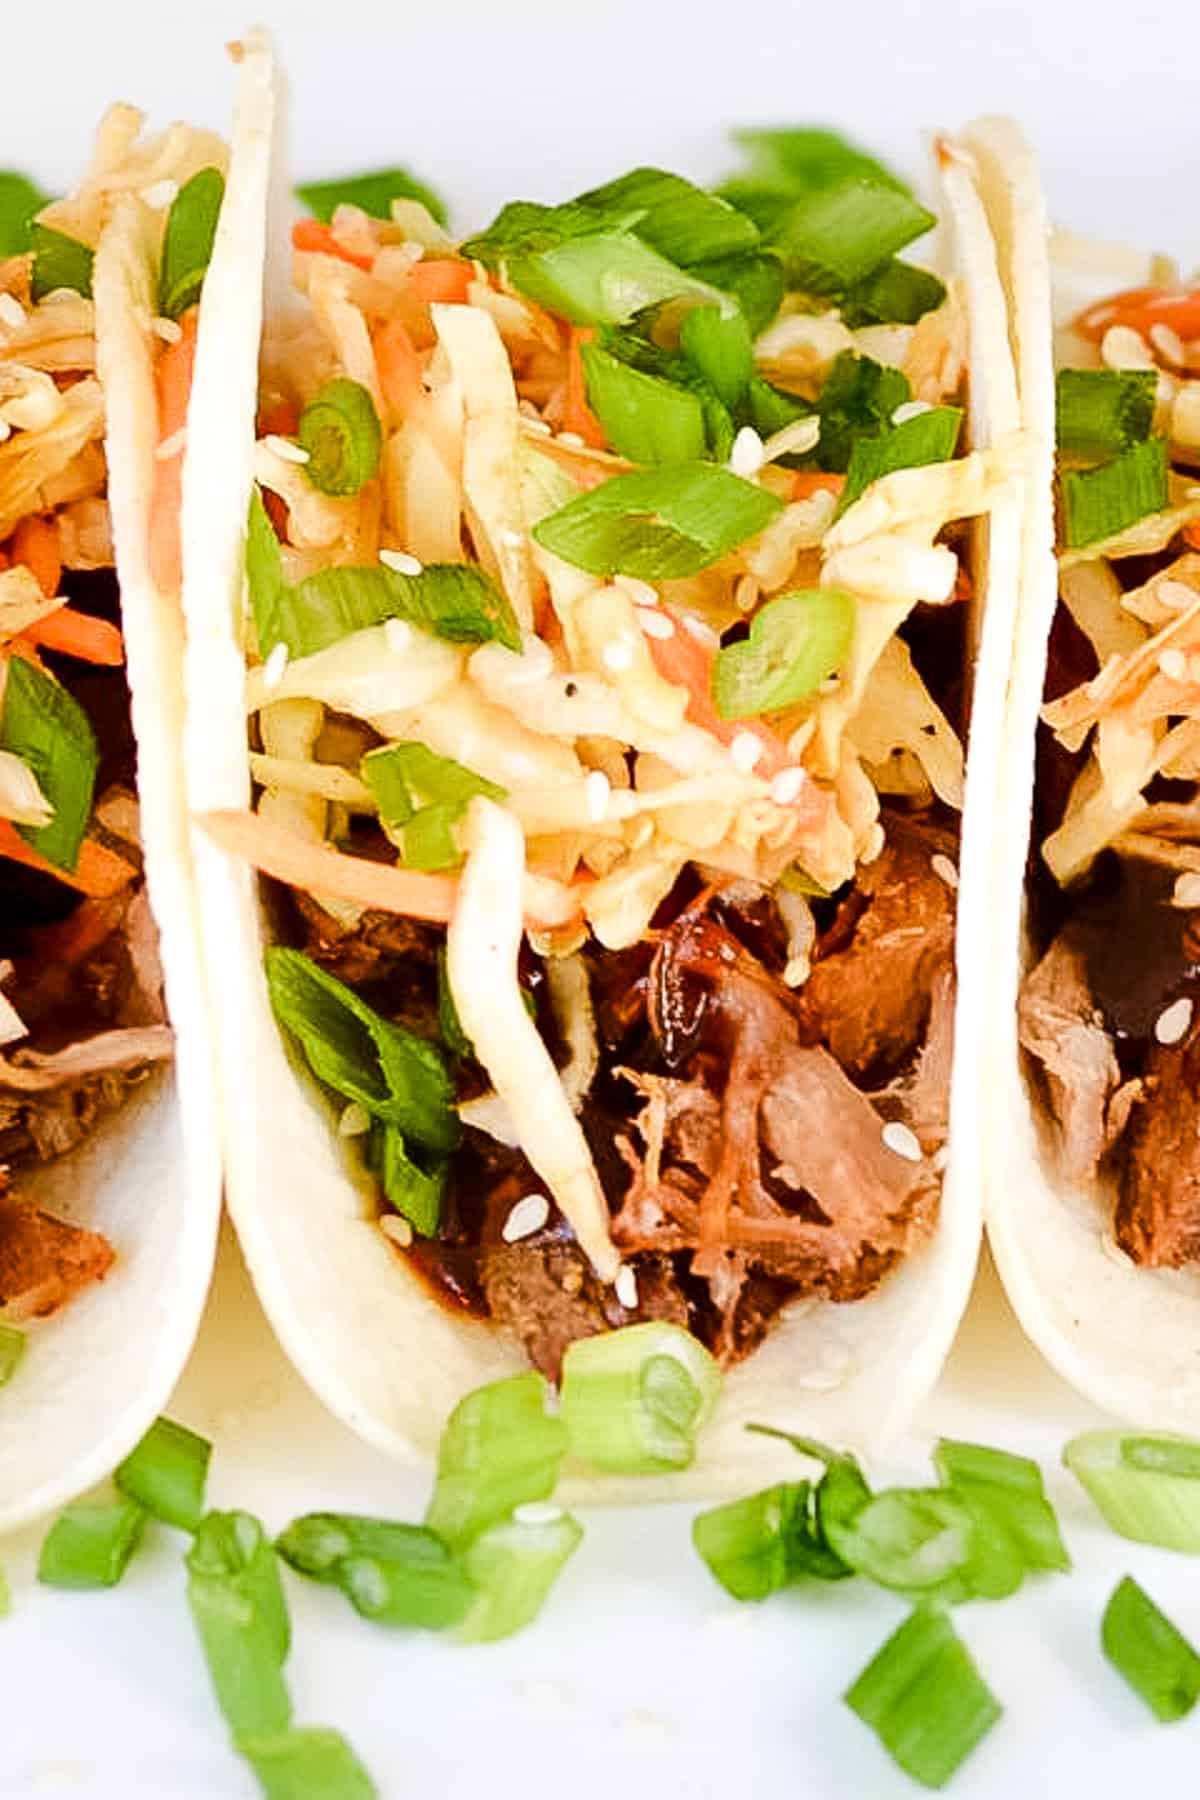
Green Onions and Sesame Seeds — I've added these toppings in the tacos pictures. They are not necessary but add just a bit of flavor and lots of beautiful color.
Sesame Mayonnaise — I mixed up sesame mayonnaise for these Korean BBQ Sliders and it would taste great drizzled on top of these tacos as well.
Pickled Red Onions — I make pickled red onions and use them of just about everything. They're seriously so amazing. Slightly sweet with lots of vinegar-y tang. I love this super simple recipe from Gimme Some Oven.

Korean BBQ Tacos with Quick Kimchi
Ingredients
For the Pulled Pork
- 2-3 pounds pork shoulder/butt
- ½ cup reduced sodium soy sauce
- ½ cup water
- 1 teaspoon sesame seed oil
- 1 tablespoon rice vinegar
- 3 cloves garlic minced
- ½ teaspoon ground ginger
- ½ teaspoon ground pepper
For the Korean BBQ Sauce
- ¼ cup low sodium soy sauce
- ¼ cup water
- ¼ cup light brown sugar
- 1 garlic clove minced
- 1 tablespoon rice vinegar
- 1 teaspoon sesame seed oil
- ½ teaspoon ground ginger
- ¼ teaspoon ground pepper
- 2 teaspoons chili paste such as Sambal Oelek more or less to taste
- 1 tablespoon cornstarch
- 2 tablespoons water
For the Quick Kimchi
- 6 cups shredded cabbage 16 oz bag of store-bought works great!
- 3 tablespoons canola oil
- 6 tablespoons rice vinegar
- 2 teaspoons chili paste such as Sambal Oelek more or less to taste
- ½ teaspoon ground ginger fresh or powdered
- 3 tablespoons granulated sugar
- 1 ½ teaspoons sesame seed oil
- ½ teaspoon each salt & pepper more to taste
For Serving
- 1 package corn tortillas
- 1 cup Mexican shredded cheese store bought
- ½ cup diced green onions green part only
- sesame seeds to sprinkle on top optional
Instructions
For the Pulled Pork
- Place the pork butt/shoulder in a slow cooker. In a separate bowl stir together the remaining ingredients. Pour over pork, cover and cook for 8 hours on low or 4 hours on high—until it falls off the bone.
- Once meat is cooked through and falls apart easily, shred with a fork and discard bones. Return meat to slow cooker to soak up the sauce.
- Turn broiler on to high and let heat for a few minutes. On a dark baking sheet, lay out a single layer of shredded pork, draining some of the sauce when you transfer to the cooking sheet.
- Place on the top rack of the oven and let meat get some slightly crisp areas. This takes about 5-10 minutes, stirring once. Check it often so you don't burn it. This step adds flavor intensity and texture variation.
- Once meat has been broiled, transfer to a bowl to store for later or serve now.
For the BBQ Sauce
- Add all ingredients, except for 2 tablespoon water and cornstarch, to a skillet over medium heat. Bring to a boil. In a separate bowl, combine water and cornstarch until cornstarch is completely dissolved. Add cornstarch mixture to sauce and continue to boil until sauce thickens (about 2 minutes). Remove from heat and set aside to serve. (If you like sauce, then double this recipe, it's amazing and you'll want a lot of it!)
For the Quick Kimchi
- Place cabbage in a large bowl. Set aside. In a small bowl, combine the rest of the ingredients. Pour over cabbage and mix well. Set aside for serving right away, or store in an airtight container until ready.
Assemble
- Wrap corn tortillas in a wet paper towel and place on a microwave-safe dish. Microwave on high for 2 minutes or until tortillas are very hot. This step helps your tortillas stay together while you're eating!
- Add meat, sauce, cheese and kimchi to each taco. Top with green onions and sesame seeds. ENJOY!
Notes
Nutrition


Diane
This was AMAZING Sweet, salty, a bit of spice, the crunch of the slaw with the tender pork, its everything you want in a taco. I can't wait to make this again but I am making as a puff pastry pizza.
Christine
Flavor bombs! This recipe is amazing! Yea me! This recipe makes a lot of tacos. You are right, that BBQ sauce is insanely good. So is the kick kimchi. This recipe is a keeper.
Amy
So glad you love it!!
Tara
Wowzah!!! This is incredibly flavorful, easy to make and will most certainly become one of your favorite recipes for an “outside of the box” taco night.
Victoria Swanson
So delicious…. Followed recipe…. Didn’t use cheese though… I felt it didn’t need cheese.. and we had flour tortillas, as I’m not a fan of corn..
Easy to make and assemble…. 🥰
Catherine
Superb!!!! Wish I made more!!! Best tacos I ever had !!! Didn't have chili paste but otherwise still delicious!!! We used smoked pulled pork Sauce was sweet and tangy and cabbage slaw was Devine! Perfect combo
Amy
So glad you loved these tacos! They're a staple in my house.
Jo Ann
What sides do you serve with these tacos?
Amy
These tacos are a great meal on their own, but to turn it into a bigger meal, you can serve some Cilantro Lime Rice on the side, or our popular cream cheese wontons, or sumi salad cups. However you serve them, everyone will love these tacos!
Patty
Does the Kimchi need to be refrigerated if making ahead of time?
Amy
Yes, it should be refrigerated if making ahead of time. Enjoy!
Paula
These were very good! I had meat from a pork roast left over so I used that. I made the BBQ sauce and quick kimchi from your recipe they were so good. These will be made regularly. Thank you for sharing!
JM
Looks great and looking to make these this week. What is the sodium qty in your recipe for reduced sodium (meat) and low sodium (sauce)? I have San-J tamari with various lower sodium levels but concerned they are still too high. Looking for how many mg per serving is considered good/ok. Thanks!
Amy
You're right, they'll all be a bit different. Reduced sodium typically has closer to 500mg sodium per tablespoon (vs. 900+ in regular soy sauce). I recommend tasting as you go to ensure it doesn't get over-salted. Enjoy!
Lacie
Absolutely love this recipe. It has become a staple! Have you ever done the meat in the instant pot? Wondering how the cook time would vary.
Amy
I don't have an instant pot, so I haven't tried it with this recipe. I'm sure it would work great, though. Let me know if you try it!
Kristin
This recipe is amazing! We’ve made it so many times and people (including our children) just love it.
If I could give it 10 stars I would!
Antoinette
These are amazing!! So good!!
Abby
Thank you for the inspiration! I used your sauce with my already made Costco pulled pork. It came out amazing! Also topped the tacos with Cleveland Kitchen’s kimchi. Yum.
Karen
Hi, my daughter loves Korean food so would like to try this. However I'm from the UK so I'm unsure of your measurements. For example 1/2 C of soy sauce, what does the C mean?
Amy
Hi Karen! Sorry about that, the C stands for cup. I'll update the recipe so it's clearer.
Angela
Menu planning for next week. My boys would love to try these out. This would change up our regular old taco nights.
Sarah
I’ve made these so many times. This recipe is a winner! Be sure to use low sodium soy sauce, just like the recipe calls for. I didn’t the first time I made them and they were way too salty. Every time I make them, everyone wants the recipe. I’ve shared your recipe with at least a half dozen people.
Lori
Can’t wait to try this! Is the nutritional information per taco, or is a serving more than one taco? Thank you!
Amy
The nutritional information is approximately one taco. Enjoy!
Nicole
SO delicious!!! I am so happy to have found this. Will absolutely be making these again many times in the future!
Mary
My family might love these, We'll have to try these out for dinner!
Joyce
Absolutely delicious...my family loved it! My daughter used jicama tortillas and it was a perfect complimentary crunch.
Stephanie
Can't wait to try this. Looking for fresh ideas for the new year.
Vanessa
Thanks for sharing! Does the meat reheat well?
Amy
Yes! I add a bit of water or more of the Korean BBQ sauce and reheat in the microwave until hot.
Suzanne
This looks so good! What a great way to put a new twist on Taco Night!
Jessica
Would you be able to make this in an instant pot? If so for how long should you cook it?
Amy
Yes! I haven't tried it, but the conversion should be 15 minutes per pound in an instant pot. Let me know how it works!
Vanessa
Thanks for sharing! Do you use this kimchi in any other recipes?
Amy
Hi Vanessa, yes! We also use this kimchi in our Korean BBQ Sliders recipe here: https://www.theovenlight.net/2018/02/korean-bbq-sliders-make-ahead/
These were one of the first Korean-inspired recipes I created from scratch and it's my all-time favorite. Let me know how you like it!
Suzanne
This looks so good! What a great twist on a classic!
Amy
Hi! Just made this and it’s delicious! We chose to make this into a bowl and sever over rice instead of in a tortilla. We doubled the sauce because it’s so good. It’s quite thick (which is a-ok!) and I was wondering if you refrigerate the leftover sauce?
Amy
I'm so glad you loved it! I always store the leftover sauce in an airtight container and just reheat and reuse! It should stay good for up to 2 weeks (though it never lasts that long).
Jamie
Could I substitute Chicken
Amy
Absolutely! These tacos would taste amazing with chicken! You can still marinate the chicken ahead of time, and then either dice and cook, or bbq and then dice. Let me know how it goes.
Jennifer
Hi Tasha! Can you tell me if the nutritional information provided is for the entire recipe (sauces, kimchi, tortillas, cheese) or just the beef? Thank you!
Amy
The nutritional information on the recipe is for the whole recipe, I don't have the breakdown for each part of the recipe at this time.
Mariah
My family LOVED this! Thank you so much for sharing. The sauces were fantastic so I definitely recommend doubling the sauce recipes.
Amy
I'm so glad you loved it!
Geri Hoenshell
So I totally misread the recipe and cooked the meat in the bbq sauce. They were still great! I also added cilantro to the slaw and a little Mayo to the slaw dressing (to cut the acid a little for the vinegar haters in my family). Definitely will be making them again.
Amy
So glad you loved this recipe! Glad it worked out.
Ruth
Hi! Do you mince the garlic in the sauce, or leave them whole?
Amy
Mince it up! Thank you for pointing that out, I've updated the recipe so it's clearer.
Kristen Spangler
Was really good, however the barbecue sauce came out extremely salty and it kind of overpowered everything. You had to not put so much on and I don’t know what I did wrong. I followed the recipe minus the chili paste. I use a little Sriracha instead.
Amy
Hi Kristen,
Did you use low-sodium soy sauce? That makes a huge difference in the saltiness of the sauce. Let me know if you try again or if you have any other questions!
Anonymous
Yes, I found this very salty. Next time no salt added to the pork and only low sodium soy sauce. Also I’ll water it down more as well so 1/4 cup of low sodium and 2/3 cup water to the pork. Then the sauce will have less soy sauce and some water plus I’ll taste it.
Amy
Thank you for your comment! I've changed the recipe recently to reduce the sodium in the sauce. I had used a very low sodium soy sauce previously, but most low sodium soy sauce is still pretty salty. So now the recipe is 1/4 C low sodium soy sauce and 1/4 C water to help cut the salt. Feel free to play with the balance to get it the way you like it.
Janey
Made this in the instant pot following your instructions. Turned out great. Finished it off in the oven to crisp up some pieces. So many great flavours, the whole family enjoyed this. Will definitely make it again.
Amy
So glad you all loved this recipe!
Kristin
What settings/time did you do this at in the Instant pot? I no longer have a slow cooker and would love to pressure cook this!
Anonymous
So delicious, made it for dinner tonight. I’m excited for leftovers tomorrow. In my top five favorite dinners!!
Wendy
I made these for dinner tonight. The will definitely will be a go to!
Amy
I'm so glad you liked them!
Tee
Cannot wait to try this! What do you suggest as side dishes to go with these tacos? I’m thinking of Asian side dishes, not Mexican.
Amy
Ooh, good question! Try our coconut cilantro lime rice (kind of Asian, kind of Mexican), or our cream cheese wontons!
Catherine
I think this is a really good recipe. The meat turned out great. I think I will always broil slow-cooked meat from now on! The kimchi was good as well. I do agree with some others about the sauce. I did use ls soy sauce but we still found it very overpowering. I didn't mix the sauce in with the meat so I think I'm going to try and remake the sauce tonight using less soy sauce and more water.
Scotty
We make a Korean potato salad or an asian type Cuke salad as a side for these tacos, but something cool and not spicy will work with this type of dish.
Dean Bannon
AMAZING!!! This is my 2nd round with this recipe Everyone devoured them. We did both corn and flour tortillas. Yummmmmy. Will definitely continue making this
christina
This is great! My husband ate them on corn tortillas, but I had them on lettace wraps! Very good! I didn't have low sodium soy sauce and should have reduced the amount of salt, but still amazing!! Will definitely make again!
Amy
So glad you enjoyed them! Lettuce wraps are a great idea!
Carly Nelson
Super good! I already smoked a pork butt to make pulled pork so I used the sauce and heated the leftovers in a pan until the sauce was absorbed, placed on a baking sheet and broiled about 10 minutes. Followed the rest of the directions as noted and used flour "fajita size" tortillas. Topped with Sriracha as well. I didn't need any side dishes!
Amy
Sounds amazing! Thank you for trying one of our recipes!
Tasha
So good I’ve made it 4 times now! The whole family loves it. The only i thing i do different is fry the tortillas!
Amy
Tasha, thank you for your comment! And yay! This makes me so happy. I love the idea of frying the tortillas, I'll have to try that next time!
Karla
La Choy soy sauce has always been gluten free and I usually have luck finding it in grocery stores.
Amy
Thank you for the tip! I'll grab that one next time I'm at the store.